This post is about using special DEM data for map creation. If you have no clue what DEM data is, read the article on wikipedia first.
I use Maperitive to create my own map, optimized for hiking/biking. Right now, Maperitive uses SRTM-1 and SRTM-3 DEM data (HGT-Files). A decent description of SRTM-files can be found at vterrain.org.
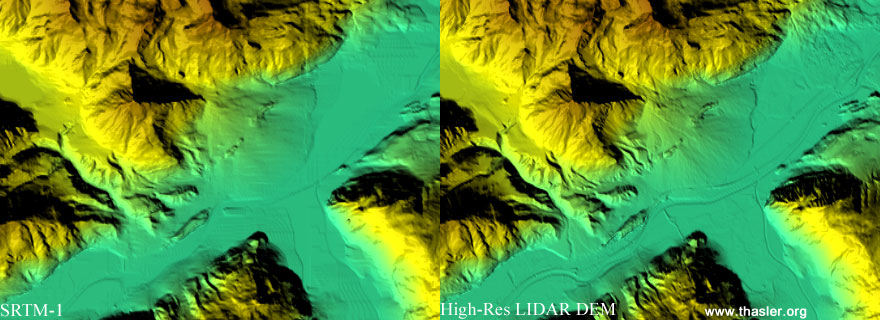
The Austrian Government (Land Tirol) has published high-resolution DEM data (TIRIS) derived from airborne laser scans (LIDAR) over their territory. This TIRIS-data has a resolution of 10m, which is 3-4 times more accurate than other existing SRTM-1 DEM data. The most accurate SRTM-1 data (I have found) for Tyrol is available on Jonathan de Ferrantis website Viewfinder Panoramas.
Here is a comparison (note the detailed rendering of the roads/rivers on the right image):
The goal of this article is to use this data as source for all DEM-related operations like hill-shading or contour lines with Maperitive.
Preparations
First of all, we need the DEM data from Tyrol. It can be obtained from this page. Download and unzip into one folder (skip “Bezirk Innsbruck” it’s a subset of “Bezirk Innsbruck-Land”). There should be 8 files named “*_10m_float.asc”.
The TIRIS data format is Arcinfo ASCII-Grid which is more or less a plain text file with height information (details later). Maperitive cannot use it. We need to convert this data to an SRTM-1 HGT file. That’s why we need to set up a working GDAL environment. Visit the GDAL-website and follow their installation instructions for your environment. Make sure you also install the proj-package (including development-files) in a linux environment. We will need the gdal_translate and gdalwarp tools.
To merge the TIRIS data with an existing SRTM1-tile please grab a copy at the viewfinder website. In this example I will use the file N47E011.hgt tile. It covers the region around Innsbruck.
I use an OpenSuse installation within a VirtualBox for the GDAL-Toolkit. You can get an OpenSuse image here. You may also need a shared folder in OpenSuse for data exchange to the host computer. If you have problems setting up your environment, let me know.
That was the most boring part. Now lets have a look at the DEM data itself.
TIRIS DEM data
Here are some key facts about the DEM data the Austrian government of Tyrol provides:
- Data format: Arcinfo ASCII-Grid
- Datatype: Float32
- Resolution: 10m x 10m.
- Projection: Transverse Mercator (EPSG 31254). See “Informationsblatt.txt” provided with every zip-file for more details.
To get an idea how impressive (meaning accurate) the TIRIS data is, you should have a look at it first (Scale: 1 pixel=10m):
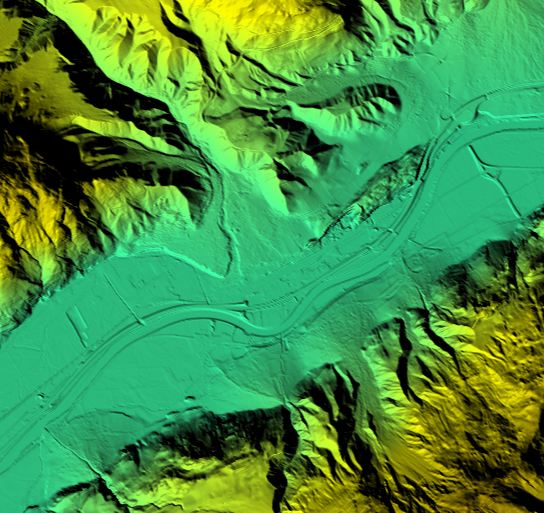
To visualize the raw DEM-data I recommend GlobalMapper. The unregistered (“free”) version can load and display most DEM formats including the Arc ASCII Grid. However, the “free” version cannot save any data. But that’s no problem, since we have GDAL at hand.
You can also give VTBuilder a try. It has similar visualization functionality and is also able to save data. However, I was not able to convert the TIRIS data into SRTM format without offset errors in the resulting SRTM1-HGT file.
Converting to SRTM-1
This is the complete shell script to convert the TIRIS DEM data into STRM1-HGT:
# create backup of original SRTM1-HGT file
cp N47E011.hgt N47E011.old

# convert original STRM1 to TIFF
gdal_translate N47E011.hgt N47E011.tif

# convert and merge all TIRIS data to one TIFF
gdalwarp -s_srs EPSG:31254 -t_srs EPSG:4326 -srcnodata -9999 -r bilinear
         -overwrite -te 11.0 47.0 12.0 48.0 -ts 3601 3601 -order 3 -et 0.0
         -wt Float32 -wo SAMPLE_STEPS=100 -dstnodata none *10m_float.asc N47E011_tiris.tif

# merge TIRIS-TIFF into old SRTM1 data
gdalwarp -s_srs EPSG:4326 -t_srs EPSG:4326 -r bilinear -order 3 -et 0.0
         -wt Float32 -wo SAMPLE_STEPS=100 N47E011_tiris.tif N47E011.tif

# convert result back to SRTM1 (overwrite original file)
gdal_translate -of SRTMHGT N47E011.tif N47E011.hgt
Let’s get step by step through the script:
cp N47E011.hgt N47E011.old
Creates (copy) a backup of the original SRTM1 data. In case you want to use the original file later for another purpose.
gdal_translate N47E011.hgt N47E011.tif
Use gdal_translate to convert the original SRTM1-HGT data into GeoTIFF format. We need this to merge the new data derived from the TIRIS DEM into the existing SRTM data.
gdalwarp -s_srs EPSG:31254 -t_srs EPSG:4326 -srcnodata -9999 -dstnodata none -overwrite -te 11.0 47.0 12.0 48.0 -ts 3601 3601 -r bilinear -order 3 -et 0.0 -wt Float32 -wo SAMPLE_STEPS=100 *10m_float.asc N47E011_tiris.tif
With this mighty command, you grab every TIRIS file (*10m_float.asc) and convert in into a GeoTIFF. During this process, we define the source and target projection, tell the converter to skip non existent data represented as -9999m above sea level in our source file. In case there is already an existing GeoTIFF, we will overwrite it. It also needs to know what SRTM-tile we are going to be in (lower-left-upper-right window) and what the target resolution we want. Note that the resolution of SRTM1 data is 3601x3601. We can’t do better here. That is also the reason why we need to rescale the input data with a bilinear 3rd order filter. The red parts should set reprojection quality to high but I’m not sure they do anything at all.
Ok, here comes the tricky part:
gdalwarp -s_srs EPSG:4326 -t_srs EPSG:4326 -r bilinear -order 3 -et 0.0 -wt Float32 -wo SAMPLE_STEPS=100 N47E011_tiris.tif N47E011.tif
It’s almost the same as the command before except it isn’t. Note that the -overwrite option is not set. This command merges the current SRTM1-file (the tif we created with the second command from a hgt-file) with our converted TIRIS-data. The new (=better) data is copied into the old file where available. Other parts remain the same as in the original file:

The last command converts the tif back to a SRTM1-hgt file:
gdal_translate -of SRTMHGT N47E011.tif N47E011.hgt
That’s it. We have our updated hgt-file based on high-precision LIDAR-DEM data.
Covering Tyrol
The above script is just an example an depends on hard-coded coordinates and tiles. Therefore I have to create a more complex script that covers all of the affected tiles for Tyrol (coming soon).